Tag Archives: Tutorials

Reverting Missing Eyes to Maxis Defaults

Have you deleted a custom eye colour, only to find that your sims are left with ugly Maxis brown eyes? Especially when you have splendiferious default replacements that you'd prefer your sims to have?

Here's a quick guide to fixing it.

You will need:

FIRST OF ALL: Backup your saved games. Go and do it now. Go on.

dew it!

Done? Okay. Open SimPe and go to Tools > Neighbourhoods > Neighbourhood Browser, like so:

tut-fixeyes1neighbourhood

Select the neighbourhood of the offending sim, then let it do its thing. Then click Tools > Neighbourhood > Sim Browser

tut-fixeyes2simbrowser

Click on Name to make it easier to search, then look for your sim. Double-click him/her.

Click on More > Open Sim DNA

tut-fixeyes4changesimdna

This part is simple enough. You need to replace the eye values with the Maxis GUIDs. Here they all are:

  • 32dee745-b6ce-419f-9e86-ae93802d2682 Brown
  • 2d6839c5-0b7c-48a1-9c55-4bd9cc873b0f Dark Blue
  • e43f3360-3a08-4755-8b83-a0d37a6c424b Light Blue
  • 0758508c-7111-40f9-b33b-706464626ac9 Grey
  • 51c4a750-c9f4-4cfe-801c-898efc360cb7 Green

Just replace the string in the dialogue with the GUID of the colour you want. I'm going for Light blue here.

tut-fixeyes5changesimdna

Once you've entered the new values, hit Commit and then save your file.

Close the Sim DNA panel by pressing the little X above the Commit button. Now you should be back on your sim's profile. Click More again, and this time select Open Character File:

tut-fixeyes6openfile

Click Age Data in the Resource Tree panel, then Age Data in the Resource List Panel. Click eyecolor (dString) and replace it with the Maxis GUID you used earlier. Then hit Commit and save the file.

tut-fixeyes7agedata

Almost done!

Load up your game. Load up your Sim's lot.

ugly eyes

Eww, there are those ugly Maxis brown eyes.

Select the Sim and send them to a mirror. Select Change Appearance (you don't have to actually change anything), then press the confirm button. Now check out your Sim's new default (replacement) eyes!

new eyes

You can also change to a custom eye colour. Instead of the Maxis GUIDs above, just find the GUID of the custom eye you want. Open up the file in SimPe and do this:

tut-fixeyes8customguid

Making Pets BodyShop Downloads work for all EPs

The tutorial on MTS2 is so flipping long-winded, so here is the quick version! Right, this tutorial will show you how to correct files made with the unpatched Pets BodyShop. These are incompatible with non-Pets versions of the game and will show up in CAS usually as a nude body, but sometimes clothing will even show up as hair! In any case these will not work with your game unless you install Pets, so you need to correct it manually.

Shut up, just tell me how to do it!

Okay, first, open up the culprit file in SimPe.

Now, in the left-hand column in SimPe, click on Property Set, then click on whatever comes up in the Resource List window. Then in Plugin View, click on 'Parts'. (If you can see a property here called 'outfit' then the file is already compatible, so leave it alone!). With the 'Parts' resource selected, click on the 'add' link. Have a look at the screenshot below if you need to.

Pets BodyShop correction

After you've pressed 'add', another line called 'parts' will be added at the end of the list. Make sure this line is highlighted. Then on the right hand side, change the text that says 'parts' to 'outfit. Click the Commit button, then save the file.

Pets BodyShop correction

Just to be on the safe side, delete the following cache files from My Documents\EA Games\The Sims 2

  1. Groups.cache
  2. cigen.package
  3. Everything in the Thumbnails folder

And that's it! The file will now work with your game!

Isn't there an easier way? I'm scared of SimPe 🙁

Try the Wardrobe Wrangler by DJSsims.com. Read the PDF manual for instructions. Mind you, it never seems to recognise dodgy files. The Fix button always remains greyed out for me, when I know for a fact that the file needs fixing, but maybe I'm just doing it wrong. Let me know if you have more luck with this.

How do I find the problem files in the first place?

It's not such an easy job, but here are some hints. Every time you download something new, place it in a 'Latest' folder (you can see I've done this in the screenshots above). So if you notice a nudie next time you load CAS (Create-a-Sim) in the game, or if you load up BodyShop and notice it's not there, you'll know it's a recently downloaded file and so it'll be easier to locate. Look at the tooltip in CAS and note it down, then exit the game and scan the relevant folder with the Clean Installer and look for whatever was in the tooltip, have a look at the texture, if it matches up, hover over the file name and you've found your man. I also have the habit of renaming files to make them easier to recognise (e.g. creatorname-pinktopAF.package is more recognisable than 8f5369d_prettytop.package).

If you don't mind using boolprops, you can use the cheat boolprop testingcheatsenabled true to show the filename in CAS (I think. I don't actually use this myself)

Download Troubleshooting

... and other super happy fun stuff.

Please read all the info on this page before complaining that 'it doesn't wooooork!!!'

This is only DOWNLOAD troubleshooting! If you are having other issues with your game that are not related to custom content, please visit The Sims 2 Wiki

What's a torrent?

bitTorrent is a method of P2P filesharing. You will need a bitTorrent client like qbit torrent to download. Once you've installed that, just follow the link to the torrent you want, click 'Download this torrent'. When prompted, open it with qbit torrent and away you go.

A seeder is someone who has a complete copy of all the files in the torrent. Without seeders you will not be able to download all the files. I'm trying to seed for as long as possible, but I can't keep all these files on my hard drive forever. I clear out a few torrents now and then, and unfortunately if no one else is seeding there's nothing I can do. You'll just have to wait till a seed connects, or get what you want from the booty. Therefore, once you have a complete copy of a torrent, please leave it to seed until your ratio at least goes up to 3 (unless its a large torrent, in case 1.5 will do ;)). Even if you only want part of the torrent, please just let whatever you have seed for a while.

Please see this page for more on bitTorrents

Booty or bitTorrent?

If you only want a small number of files, then taking the file from the booty would be more convenient, as in most torrents I've grouped things together in a few large zips. So if you want most of the items by a particular artist, then getting the torrent would be faster and easier, plus you will help to ease the load from the booty servers.

PS. I don't run the booty... just in case you didn't get it the first time.

Installation Instructions

All files should be unzipped into My Documents > EA Games > The Sims 2 > Downloads (with a capital D). Create the folder if you don't have it. The files need to be unzipped! Just placing the zip files in the folder will not work! I recommend Extract Now for batch unzipping.

You can organise your downloads into subfolders if you have Nightlife or above. If you don't (i.e. only the base game or Uni), move everything out of the subfolders and into the Downloads folder direct.

Troubleshooting

.package files should be placed directly into the Downloads folder, they will automatically be installed. Don't double click them or anything, just place them straight in. Sims2Pack files need to be double clicked to install. Once installed you can delete the Sims2Pack file. Sometimes you might need the Clean Installer, especially to install sims.

Please make sure you have custom content enabled. Check your game settings if you're unsure. Installing expansion packs sometimes disables custom content, so double check.

Object recolours may require the CEP.

Some files may be EP-specific, please refer to the creator's site for details.

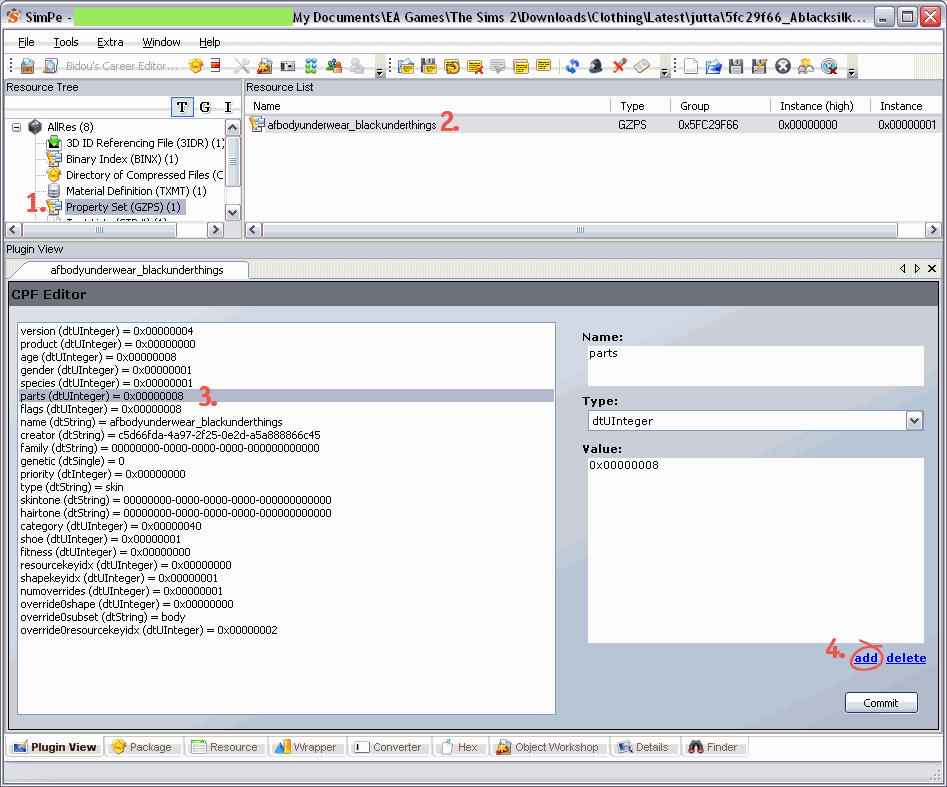
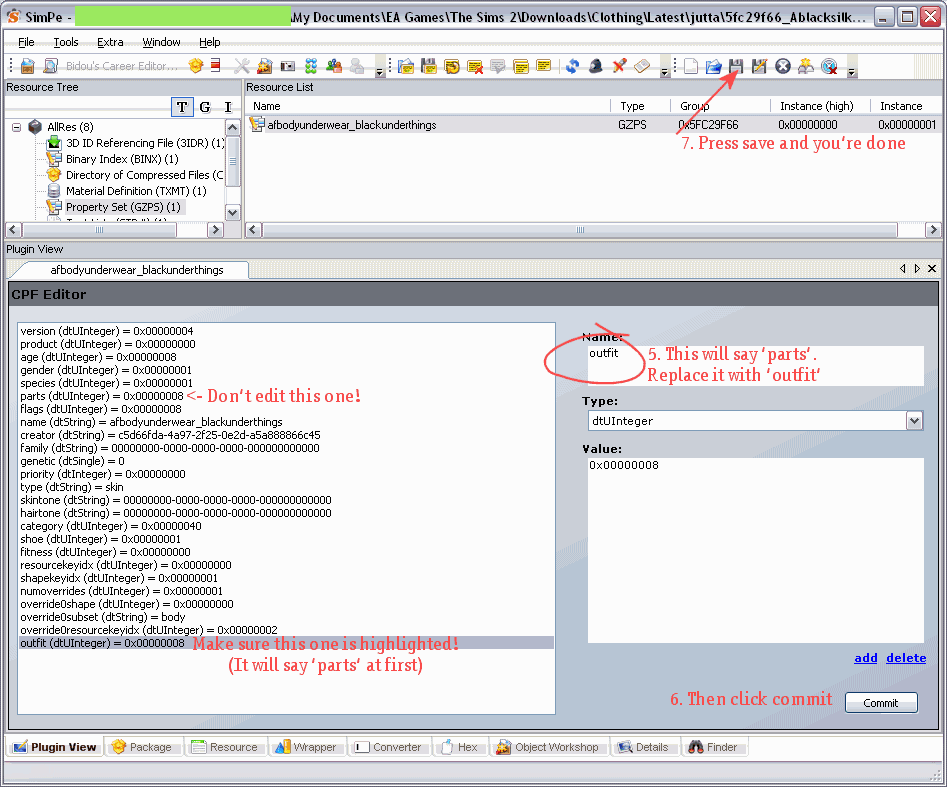
If clothing, hair, etc is showing up in CAS (usually as a naked sim body) but not working in-game or showing up in BodyShop, it was probably made with the version of BodyShop that shipped with Pets, and won't work unless you have the Pets EP installed. Either ask the creator to recreate the file with the patched Pets BodyShop or you can fix the file yourself with SimPe. Here's how to do it.

If custom content is showing up as Maxis defaults, (or for objects, not showing up at all) this means the item requires a custom 3rd party mesh which you do not have installed. Refer to the creator's site for details on which mesh is needed and where to get it. Unfortunately I cannot bundle every single mesh required for the items in the torrents.

If previews are corrupted, clean out your game's cache files. From your My Documents > EA Games > The Sims 2 folder, delete the following:
cigen.package
groups.cache
everything in the Thumbnails directory
The game will recreate these files next time you run it, and previews should be fixed. It's a good idea to clear these out now and then anyway, especially if you use BodyShop.

Is your game crashing during the loading screen after installing any of these downloads? To avoid this, I recommend creating a subfolder (if you have Nightlife or above, that is), in Downloads and calling it 'Latest', or something like that. Whenever you install something new, put it into there. Run the game, if it works fine, you can move the contents of the folder out into the main Downloads folder (or appropriate subfolder). Use this procedure every time you install something new, so if something does screw up your game (common with anything from TSR), it's so much easier to find and delete the culprit (it will most likely be a mesh file, use the binary search method to identify the baddie if you have a lot of files to get through). For this reason I also recommend installing a small number of things at a time, especially meshes.

I recommend keeping the size of your Downloads folder below 2GB, as having too many files can cause problems with your game (not to mention your game will take an age to load). Give your game a good spring cleaning now and then by deleting all custom content that you don't use. You'll find your game runs a lot smoother and is more stable when it has less CC to deal with. You can reduce the size of your Downloads folder by using the Sims 2 Compressorizer.

If you're still stuck, read Downloading for Frackin' Idiots

< < Back to the torrent list [old site]

Creating a Dynamic Sims Storybook

What you will need

  • The Sims 2 Storybook Editor - I am assuming you know how to use this. The manual is a good place to start if you don't 😉
  • A text editor, like Notepad, etc. I recommend HTML-KIT
  • My zip of goodies
  • A little knowledge of XHTML/CSS helps, but isn't necessary
  • Your completed story, obviously

Saving your XML file as a dynamic HTML storybook

Once you are happy with your final story, you can save it as a dynamic HTML file. Select the button below:

Save As

Choose a convenient location for your story files. It's best to create a separate folder for each story. Give your file a name and save with the following option:

Dynamic

It will ask you do you want to copy the images as well. Hit yes.

Now we're going to edit the code. The layout of the page is currently like this, which I don't think is very pretty.
Default layout
If you're happy with the layout as it is, that's fine. But I'm guessing you're not, which is why you're reading this tutorial. Open up your HTML file, and let's start tampering with the code!

I could just walk you through all the individual changes, but that would take too long. So let's just copy and paste - much quicker! The first thing we are going to change:

First change

Delete EVERYTHING from the top of the page up to line 156 as shown above. Now replace it with the text in change1.txt from the goodies zip (you did download it didn't you?!). On line 6, between the title tags, add your story title. This is what will show up in the title bar of the window.

What has this change done? It's replaced the legacy HTML with the more modern and correct XHTML, added a stylesheet link (more of this later), stopped the file using your story text as the image's alt text and stopped search engines from creating cache copies of your files.

NOTE: If your screenshots are NOT 600x450, you will need to edit the numbers on line 110 to whatever dimension your images are. Next up, we will change the actual layout of your page.

You need to delete everything from the <body> tag and below. That's this:

Body da da da

You can't see the text too well here. In any case, search for the opening body tag (it will be about 26 lines from the bottom) then delete this line and everything below it. So the last thing in your document should be

</script></head>

If you want the title and navigation buttons to be above the picture, as I have done for my stories, paste at the end of the file the text from change2-top.txt. If you'd prefer the title and navigation buttons to be below the image, paste in the text from change2-bottom.txt. Two lines you need to change. YOUR TITLE HERE with your story title, and YOUR NAME HERE with your name. You might also want to paste in EA's disclaimer if it won't be elsewhere on the page. Please don't remove the credit to me from the page! Since you're copying and pasting my code it's only fair I get a name-check, no?

One more change we need to do is a find and replace. If you're using HTML-KIT, hit Ctrl-H and enter <BR> into the find field, and <br /> into the replace field and hit Replace All. If you're using a different text editor you'll have to work it out yourself, usually Edit > Replace, or something like that.

Save your file and have a look at the results. The layout is now okay, but could be prettier. That's where our style sheet comes in!

Editing the stylesheet

This is called story.css. If you're going to edit the name of this file, be sure to also change the text on line 9 of your HTML file or it will not work. Copy this file into the same folder as your HTML file. Let's open up the stylesheet now. Don't just double-click the file unless your PC is configured to handle CSS files. You need to tell it to do this, otherwise open the file with your text editor.

The colour scheme here is the one I've used on my stories. Have a look through to see if you like it. You might want to change the colours to fit in with your own site scheme. Here are the bits you'd most likely want to change. It's the bit after the colon [ : ] that you need to modify. For a list of colours visit W3Schools.

  • Line 5: the page background colour. Default: #222222 (a dull grey)
  • Line 12: the colour of your links. Default: #eeeeee (off-white)
  • Line 25: the border around caption box. Default: 2px solid black (speaks for itself)
  • Line 26: the background colour of the photo and caption box. Default: #556777 (dull blue)
  • Line 35: the border around the photo. Default: 2px solid black. Replace this with 'none' if you don't want the photo to have a border
  • Line 51: this is the size of the copyright stuff at the bottom of the page.

That's it! Your story file is now ready!

Uploading your story

There are a few things you need to know before uploading. Firstly if you are using blog software like wordpress, livejournal, blogger, etc, most likely you will not be able to post your dynamic story there. Why? Because they tend to disallow JavaScript. You will need to host your files elsewhere, like tripod.com or one of those. If you have your own web server, then you can upload as is.

Hosting your pics - you will need to edit the code to link to your photos correctly. This is pretty simple; a bit of Find and Replace will sort it out for you. Find snapshot_ (don't forget the underscore or you will screw up the code!) and replace with [your url]snapshot_ e.g. in my case replace snapshot_ with

http://i228.photobucket.com/albums/ee162/silverssimstuff/JasmineOne/snapshot_

And you can also see I've created a separate folder for each story's photos. It makes it easier if you want to delete and change pics. Remember that, especially if you use a lot of photos, stories can take up a lot of space, up to 5MB or more for a typical 60 page story! Lastly, don't forget the stylesheet! You can use the same stylesheet file for all your stories, you don't need a separate copy for each one, just make sure the HTML file correctly points to the stylesheet file.

That's all! You're ready to upload your HTML file, stylesheet and photos (you don't need to upload the thumbnails, they aren't used by the HTML file).