
The kids have been getting super frustrated during lockdown, and tantrums and general bad behaviour are on the increase. So here's an idea I thought of to encourage good behaviour, and give me something to occupy my time too.
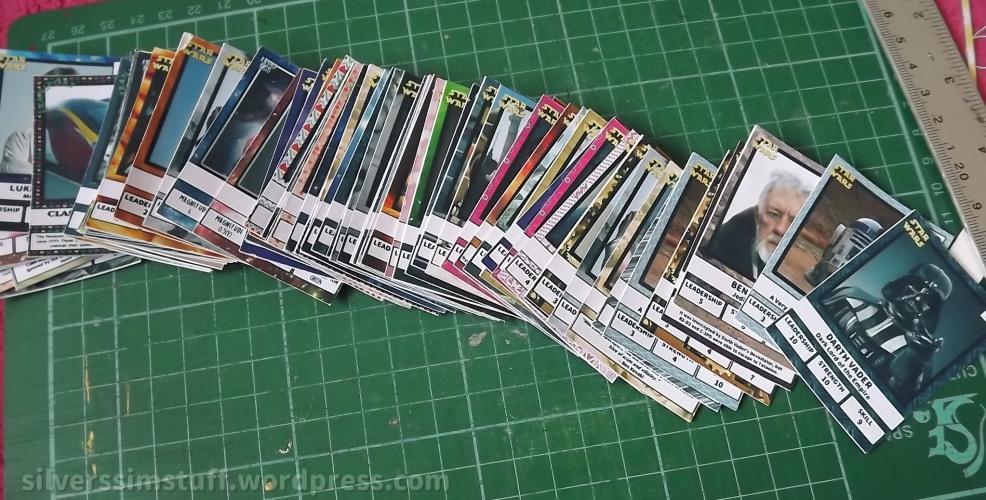
It all started with The Missing Luke Skywalker Trading Card. I had one of these when I was about 14 or 15. I may have kept it in my Sonic the Hedgehog ringbinder, and it may not be there anymore, and I may be really sad about that.
So to cut a long story short, I decided that since I'll probably never find The Missing Luke Skywalker Trading Card, why not just make my own? In fact, why not just make my own series and hope Disney doesn't sue me for everything I have?
Just bear in mind, unless you're using either your own photos/images or images you have permission to freely distribute, these need to be for personal use only. No sharing among school-friends or the kids on the street. Hence I will not be uploading the files, but I will tell you an easy and cheap way to make your own!
Ever since I made these, 2 of the kids have already started making an effort to be helpful around the house and improving their behaviour. Whenever I see them starting to do something naughty, a simple "trading cards..." is enough to get them to stop. Now since I had to invest time and money to make these, it's only fair the kids have to work to earn theirs. So if they behave mostly well, PLUS they help out with housework or just do something really kind, they get to have a trading card. Simply not being naughty is not enough to earn one.
You will need:
- Image editing software and knowledge of how to use it -- I used my faithful PaintShop Pro 7
- Photos of your choice -- for free images, try Wikimedia Commons, MorgueFile, Unsplash
- Word Processor or Drawing Program -- I used OpenOffice Draw at the time, but it sucks big time. I recommend LibreOffice
- Glossy photo paper -- I got mine from a poundshop and eBay. I used 180gsm 100x150mm, this allowed 4 cards per sheet, with each card 44x62mm
- Colour printer
- Patterned or coloured card (optional)
- Glue
- Craft knife and metal ruler, or scissors
- Sticky-back plastic (optional)
Method
1. First set up a template. Decide if you want to use stats so you can play games with the cards, or just have info. I kept the main image as the lowest layer, added a black border over it, then used a masked layer to create a graphic background, then all the text boxes go on top.

Filled in, it looks like this:

(Use CTRL+E to Paste As Floating Selection on the appropriate layers)
An example of an info-based card:

2. Keep going until you've got all the designs you want. I saved each image as a JPEG with only 1% compression. Make sure you don't tamper with the dimensions of the cards once your template is set up. All your JPEGs should have the exact same dimensions.
3. Now open up your word processor or drawing program. Make sure you set the page up to match the size of your photo paper. I used 10x15cm in portrait mode, and this allowed 4 cards per page, with a width of 42mm and a height of 66mm. Add your images until you've filled the page. Leave a border to avoid cut-off edges.

A trick here if using OpenOffice is once you have the first page of images in place, highlight all 4 together, copy and paste onto the next page, then just select each at a time, and press the Add Image from File button, then select the next image, then repeat for each page. This saves so much time! If using LibreOffice, right-click each image separately, and select the Replace Image option.
4. Decide if you want any cards to be rare. If you're making these for only one child, then one of each card is fine, but for two or more children, you can have commons (1 copy of each card per child), rares (1 or 2 less than the number of children) and super-rares (only 1 copy).
5. Print off your images. Be sure to set your printer to Photo Quality, and make sure you select Photo Paper and the correct size.

6. Trim the margins.

7. Optional step: choose some nice patterned card to go on the back. You can use the same design for all, or mix and match. Adding this makes the cards stronger, and a patterned back is nicer than a plain white one.

Glue the whole sheet on, then cut the individual cards.


8. Protect with sticky-backed plastic. I found that home-printed photos scratch very easily, so after a few games, the cards will get damaged pretty easily. I protected each card on the printed side with sticky-backed plastic. I'm not sure if some kind of spray sealant or craft varnish would work. I didn't want to risk it, and it seemed like it would take too long anyway. Be very careful when applying the plastic! If you make a mistake, you won't be able to remove it without the ink peeling off with the plastic.
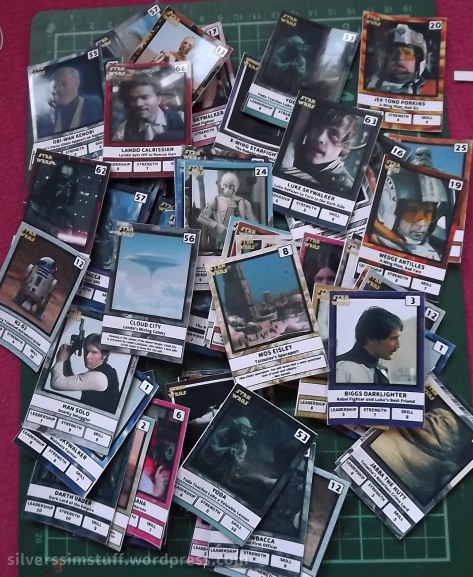
9. You now have your own trading card game to keep the kids busy and encourage them to be good and helpful around the house. When giving a card, put them face down, then allow the child to pick one at random. This way they get a random card, but they can't blame you if they didn't get the one they wanted, because it was their choice. No backsies!
As well as a Star Wars series, I also made an Astronomy series and a Transport series. You can pick any theme your kids are interested in. How about: fantasy creatures; flowers; trains; dinosaurs; birds; historical events; electronics; inventions? What about family members? You could do members of the household (including pets) at different ages. That would be quite fun, but it might be best to avoid stats!